A pair of professional speakers mounted on either side of a palm trunk, and a standing speaker beside an infinity pool looking straight out to sea.

LOUDSPEAKER WATERPROOFING & MARINE TREATMENT

Professional Upgrades for Coastal Speakers

We upgrade the professional speakers you already own into a system that stands up to driving rain, salt air, humidity and harsh sun by the sea.

COASTAL OPERATING CONDITIONS

Upgraded to withstand the 5 forces of a coastal environment

  • Driving rain and splashing waterA weather-resistant layer on the outside of the cabinet and a cover over the connection area stop water at its two main entry points.
  • High humidityTwo coats inside the cabinet help limit moisture entering the cabinet material; the protection scope depends on the model and installation conditions.
  • Salt in the airThe crossover board and the electrical contacts are coated to protect them from salt air and condensation.
  • Harsh sun and UVThe outermost finish keeps the cabinet’s colour and protects the layers underneath when the speakers sit in the sun all year.
  • Corrosion of hardwareScrews, brackets and wiring points are checked, then sealed: parts in good condition are kept, rusted ones are replaced.

WHICH VENUES IT SUITS

Solutions by venue type and mounting position

Resorts, Hotels & Pool Areas

Music runs from morning to late night across several areas, with most speakers outdoors or around the pool. A treatment plan based on the surveyed conditions aims to maintain sound quality and limit environmental wear during the high season.

  • Tony Lab Audio upgrades one cluster at a time and finishes each area before moving on — the resort keeps its music running while we work.
  • Both the inside and the outside of each cabinet are treated to limit the effects of salt air and humidity around the pool, within the surveyed scope.
  • Moisture & salt-air protection
  • Component protection
  • Longer service life

Beach Clubs, Rooftops & Outdoor Spaces

The speakers run loud every night, sit in sun and rain all year and are always in view of guests. The treatment plan depends on the operating level, construction and mounting position; sound quality and the cabinet surface are checked after treatment.

  • Tony Lab Audio stops water at the three places it gets in most: the front of the speaker, the cabinet joints and the connection area at the back.
  • We choose an approach intended to limit changes to sound quality, then test and listen again with your operator before handover for each model.
  • Sound preserved
  • Rain & UV resistant
  • Built for high output

Marinas & Yacht Clubs

This is the saltiest environment of all, and the speakers are often mounted where they are hard to reach. A thorough upgrade from the start keeps them up there longer, with fewer trips down for service.

  • Tony Lab Audio pays close attention to the hardware and the wiring points, where salt air strikes first.
  • After the upgrade the speakers can still be opened for inspection as normal — there is no need to break the protection to get inside.
  • Corrosion resistance
  • Serviceable later
  • Longer service life

HOW TONY LAB AUDIO TREATS A SPEAKER SYSTEM

Treated from the cabinet surface through to the crossover board

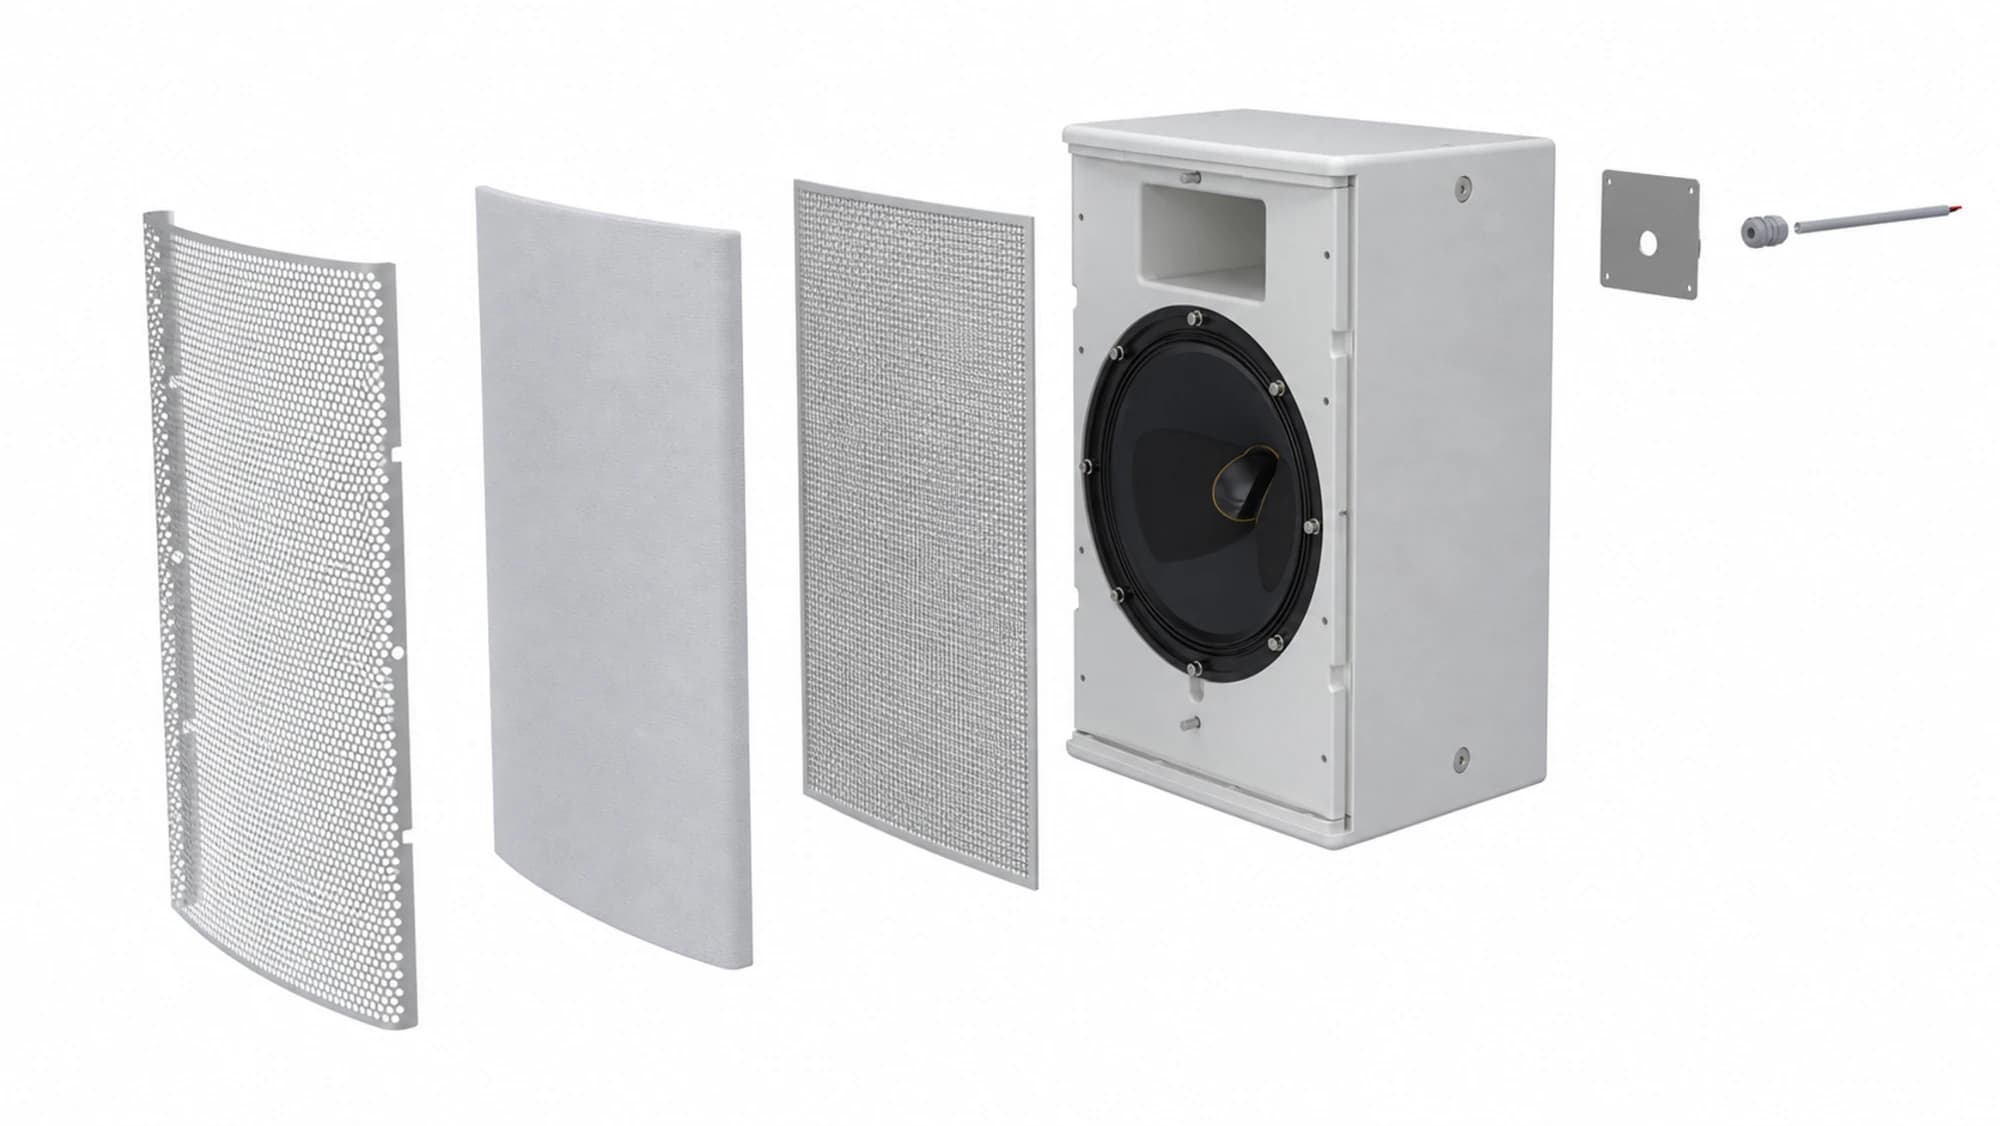
Driving water, salt deposits, humidity and UV attack each zone of a speaker in a different way, so the number of layers and the job of each layer differ too. The layers below are a typical plan — Tony Lab Audio decides which zones to treat, and how far, based on each model’s construction, the condition of the equipment and where it is installed.

Exploded view of an upgraded speaker system: metal grille, fabric layer, fine mesh layer in front of the driver, cabinet, waterproof input panel and fixing hardware.
The protective layers on a speaker system after the upgrade. The scope of treatment, the number of steps and the materials used are set after Tony Lab Audio inspects the model, its condition and its actual mounting position.

Cabinet

Cabinet Protection

Both sides of the cabinet are treated to reduce moisture damage and weather exposure, with access and ventilation preserved for the model.

  1. Layer 01A specialist coating that helps reduce moisture absorption and damage to the cabinet material.
    Where: Inside the cabinet
  2. Layer 02A second coat covers thin spots in layer 01 to improve coating continuity.
    Where: Inside the cabinet
  3. Layer 03A base coat that gives the two finishing layers above something to grip.
    Where: Outside the cabinet
  4. Layer 04A weather-resistant layer against driving rain, humidity and UV.
    Where: Outside the cabinet
  5. Layer 05The finish, keeping the surface colour and protecting the layers underneath.
    Where: Outermost layer of the cabinet

Front and driver area

Driver Area Protection

Three barriers in front of the driver are chosen for each model; their effect on sound transmission is checked after treatment.

  1. Layer 01Mechanical protection for the driver, keeping the speaker looking as the manufacturer made it.
    Where: The speaker’s original metal grille
  2. Layer 02An acoustically transparent layer that stops dust and splashing water but lets the sound through.
    Where: Just behind the metal grille
  3. Layer 03A fine mesh layer helps limit small particles reaching the driver; it is not a vapour barrier.
    Where: In front of the driver diaphragm

Crossover board

Electronics Protection

Cleaned first, protected second, with exactly the right spots left uncovered.

  1. Step 01Clean and check the components before anything is coated.
    Where: The whole crossover board
  2. Step 02A protective coat against moisture, salt air and condensation.
    Where: Suitable areas of the board
  3. Step 03Masked off and left accessible, so the board can still be measured and repaired later.
    Where: Electrical contacts and test points on the board

Connection area at the back

Connector & Water Path

Four levels of protection for the zone where water most often gets in — and the one few people ever check.

  1. Level 01A mechanical cover that keeps off driving rain and direct splashes.
    Where: Around the connection area
  2. Level 02An elastic seal that can still be removed for maintenance.
    Where: Between the cover and the back of the cabinet
  3. Level 03Seals the gaps where water could creep through.
    Where: The joints and screw holes of the connection area
  4. Level 04Re-routes the cable so water runs away outside instead of running in.
    Where: The cable into the speaker

Cabinet joints and hardware

Sealing & Hardware

The part few people notice, yet the first to fail in a salty environment.

  1. Step 01Cabinet joints are sealed to reduce liquid ingress; condensation and ventilation still need to be considered.
    Where: The joints between cabinet panels
  2. Step 02Checked for corrosion: parts in good condition are kept, rusted ones are replaced.
    Where: Screws, brackets and hardware
  3. Step 03Protected so the electrical connection stays stable for the long term.
    Where: Signal wiring points into the speaker

OUR SERVICE PROCESS

5 steps from inspection to sign-off

  1. 01
    Inspection and condition recordWe record the model, its condition and how the speaker system is being run before touching anything. This record is the basis for the scope of the upgrade and the warranty terms.
  2. 02
    Cleaning and surface preparationSalt, dust and deposits are cleaned off both the cabinet and the crossover board. This step decides how well every coat after it will grip.
  3. 03
    Zone-by-zone upgradeExactly the number of layers agreed for each zone, while keeping the sound path, the heat outlets and access for later inspection.
  4. 04
    Connection area and final sealingThe cover is completed, the joints sealed and the cable routed right at the mounting position, so water has no direct path into the speaker.
  5. 05
    Sign-off and handoverWe reinstall and test the equipment and listen again with the person in charge. You receive a record of the work done, the water-exposure limits and maintenance guidance.

BEFORE YOU DECIDE

Frequently Asked Questions

Can this be done in Vietnam, or do I have to buy imported marine speakers?

It can be done here. Tony Lab Audio carries out the upgrade in Vietnam on the professional speakers you already use — there is no need to switch to imported marine speakers or to send your equipment abroad.

How are the cost and the time worked out?

By the model, quantity, size, condition and the actual scope of treatment — a pair of speakers is very different from a system of several dozen spread across a site. Send us the quantity, the models and photos of where they are mounted; Tony Lab Audio makes a preliminary assessment, then surveys the site and gives you one quote with an expected schedule and a phasing plan, so each area loses its music for the shortest possible time.

Is the upgrade covered by a warranty?

Yes. The warranty scope depends on the condition of the speakers when we take them in — equipment in original condition and equipment that has already deteriorated cannot carry the same terms. That is why Tony Lab Audio records the condition at the inspection stage, and the warranty terms in the contract follow that record.

Is the work done on site, or do the speakers have to go away?

Either, depending on the quantity, the mounting positions and the site conditions. On site, we work one cluster at a time so the other areas keep their music; in the workshop, we treat them in batches and bring them back to reinstall in one go.

Can speakers from any brand be upgraded?

It depends on the model, its construction, its condition and access to the parts that need treatment. Tony Lab Audio inspects first and only then confirms the scope; we never assume every speaker is suitable for the upgrade.

Can speakers that are already faulty, damp or rusty be upgraded?

The extent of the damage has to be assessed first, because protection is no substitute for fixing internal damage. When a speaker is both faulty and in the wrong environment, Tony Lab Audio repairs it first and then upgrades it on a stable base — one removal and reinstallation for both jobs, and one shared record.

Should brand-new speakers be upgraded before installation?

For coastal or outdoor positions, yes. Upgrading equipment in original condition gives the best result, avoids the repairs that deteriorated speakers need first, and needs only one installation instead of taking them down again after they are hung.

Does the upgrade change the sound?

Anything added to a speaker can affect how sound passes through it. That is why Tony Lab Audio chooses the approach for each model, treats the acoustically sensitive zones with care and listens to the system again after completion — we never assume the sound stays the same in every case.

After the upgrade, can the speakers stand in direct rain or be submerged?

This service is not for submersion and does not by itself create an IP55, IP65 or any other IP Rating, or Marine Certified status. The level of exposure to rain and splashing water, and any shelter needed, is set for each plan and stated clearly at handover.

TALK ABOUT YOUR SPEAKER SYSTEM

Check the Real Condition Before the Upgrade

Send us the model, the number of speakers, photos of the front, the back and where they are mounted, and Tony Lab Audio will make a preliminary assessment and set the right approach.

Model · Quantity · Speaker photos · Mounting position